


If you like writing code or you’re just starting to learn, you’ve probably heard of AI tools that make coding easier. One of those tools is Cursor AI. It’s a smart code editor that helps you write better code, faster. And yes, it works great with C# (also called CSharp), a popular programming language.
What Is Cursor AI?

Cursor AI is an AI-powered code editor built on top of Visual Studio Code. That means it looks and feels like VS Code but adds powerful AI features. It helps you write code by:
Suggesting lines of code as you type
Explaining confusing code
Finding and fixing bugs
Helping you learn how code works
It’s kind of like having a helpful coding buddy right in your editor.
What Is C# and Why Does It Matter?
C# (CSharp) is a coding language made by Microsoft. People use it to build apps, games, websites, and more. Big tools like Unity (used for making games) run on C#. That’s why it’s popular with both beginners and pros.
If you want to build cool software or games, C# is a great place to start. And Cursor AI helps you do it faster and easier.
How Cursor AI Helps with C#
Cursor AI supports many languages, but it works especially well with C#. Here’s how:
1. Smart Code Suggestions
When you start typing in C#, Cursor AI guesses what you want to write next. This saves time and helps you avoid typos or mistakes. For example:
Console.WriteLine(“Hello, world!”);
As you type Console., Cursor might suggest WriteLine() and even complete the line for you.
2. Explains C# Code
Not sure what a piece of code does? Cursor can explain it in simple words. Just highlight it and ask the AI. This is great when you’re learning or reading someone else’s code.
3. Fixes Bugs in Your Code
If your C# code isn’t working right, Cursor AI can help you spot the problem and suggest a fix. It might even rewrite the broken part for you.
4. Writes Code from Prompts
You can type something like, “Create a C# program that adds two numbers,” and Cursor will write the code for you. You can edit it, run it, and tweak it however you want.
Using Blazor WebAssembly and C# to Build Tic-Tac-Toe in .NET Core
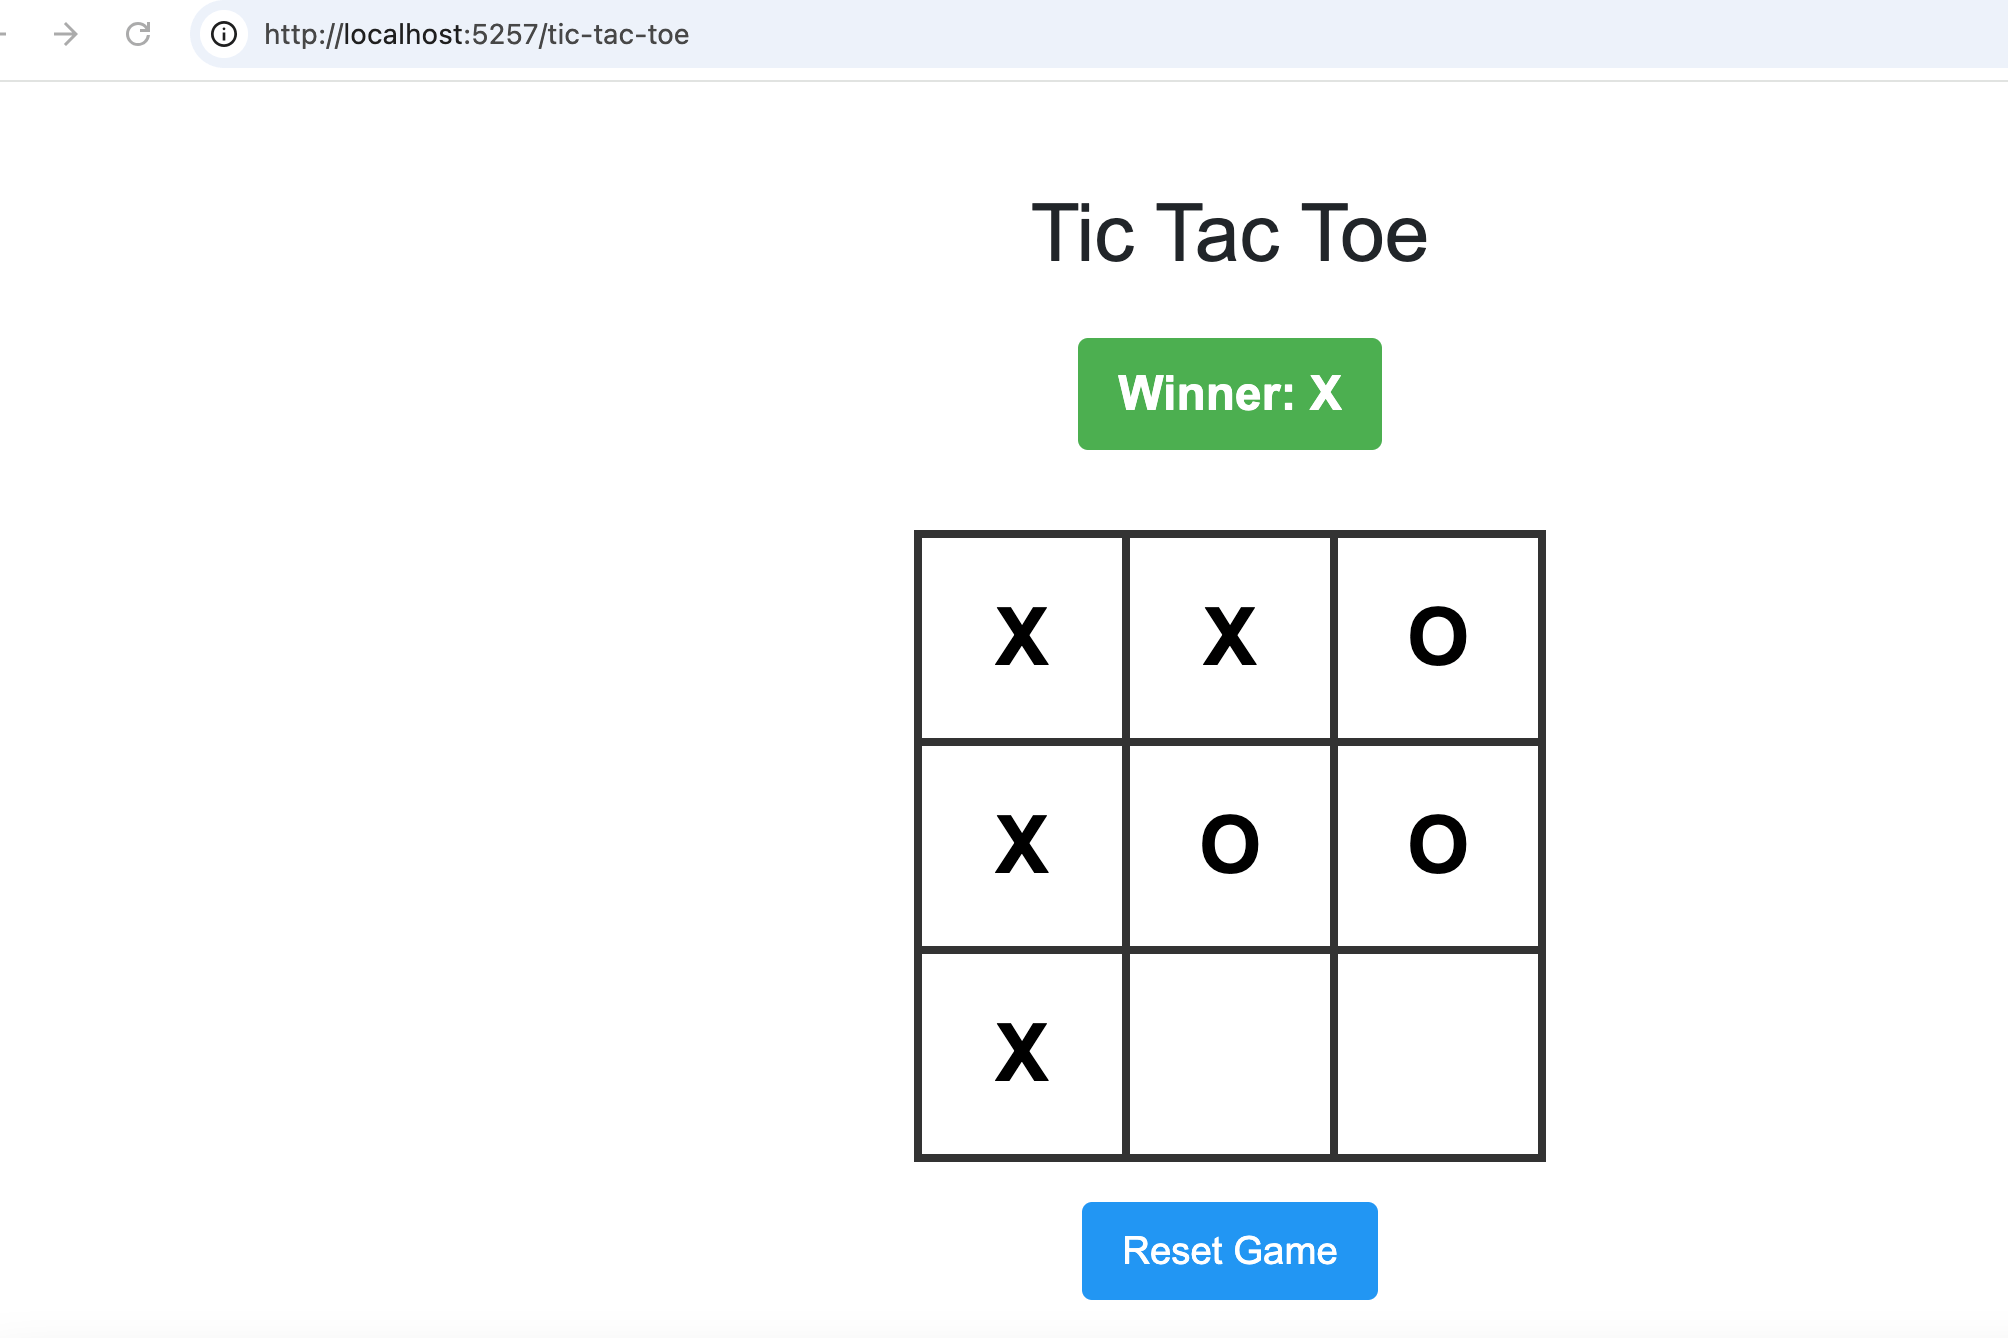
Want to learn C# and make something fun? Let’s build a Tic-Tac-Toe game using .NET Core. It’s a simple console app you can run in your terminal or command prompt.
What You’ll Need
Before we start, make sure you have a few things set up:
.NET SDK (Latest Version) installed on your computer
A code editor like Visual Studio Code
Basic knowledge of C# (variables, loops, if statements)
Step 1: Create a New Project
Open your terminal or command prompt, and run this command:
dotnet new console -n TicTacToeThis creates a new console app named “TicTacToe.
Then go into that folder:
cd TicTacToe
Step 2: Set Up the Game Board
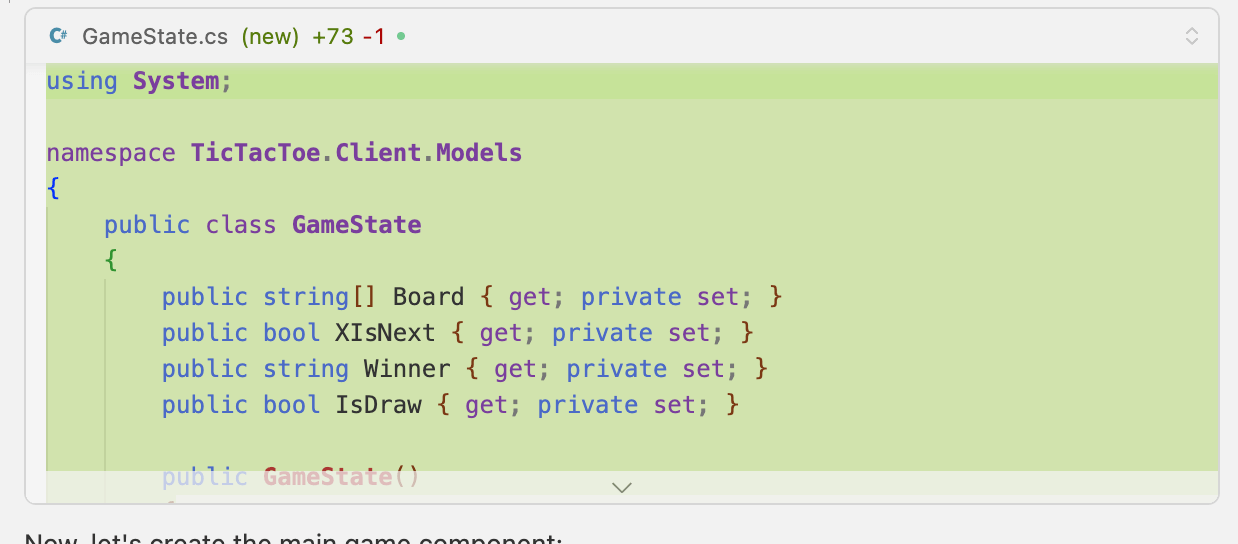
Open the Program.cs file and replace the content with this code:
using System;

namespace TicTacToe.Client.Models
{
public class GameState
{
public string[] Board { get; private set; }
public bool XIsNext { get; private set; }
public string Winner { get; private set; }
public bool IsDraw { get; private set; }

public GameState()
{
Reset();
}

public void Reset()
{
Board = new string[9];
XIsNext = true;
Winner = null;
IsDraw = false;
}

public void MakeMove(int position)
{
if (Winner != null || Board[position] != null)
return;

Board[position] = XIsNext ? "X" : "O";
XIsNext = !XIsNext;

CheckWinner();
CheckDraw();
}

private void CheckWinner()
{
var lines = new int[][]
{
new int[] { 0, 1, 2 },
new int[] { 3, 4, 5 },
new int[] { 6, 7, 8 },
new int[] { 0, 3, 6 },
new int[] { 1, 4, 7 },
new int[] { 2, 5, 8 },
new int[] { 0, 4, 8 },
new int[] { 2, 4, 6 }
};

foreach (var line in lines)
{
var a = Board[line[0]];
var b = Board[line[1]];
var c = Board[line[2]];

if (a != null && a == b && a == c)
{
Winner = a;
return;
}
}
}

private void CheckDraw()
{
if (Winner == null && !Board.Contains(null))
{
IsDraw = true;
}
}
}
}
Now, let’s create the main game component:
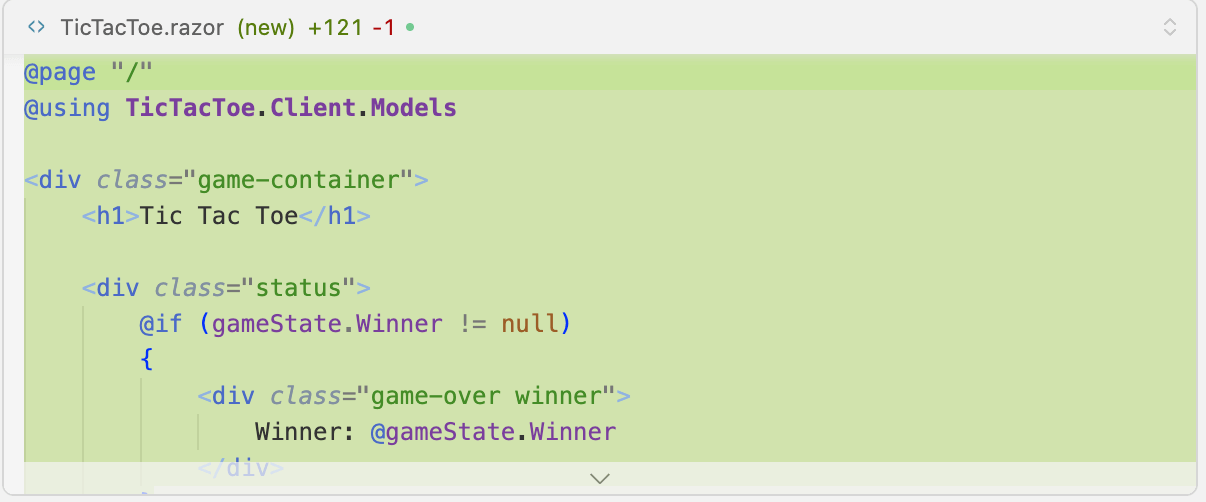
@page "/"
@using TicTacToe.Client.Models

<div class="game-container">
<h1>Tic Tac Toe</h1>

<div class="status">
@if (gameState.Winner != null)
{
<div class="game-over winner">
Winner: @gameState.Winner
</div>
}
else if (gameState.IsDraw)
{
<div class="game-over draw">
Game is a draw!
</div>
}
else
{
<div>
Next player: @(gameState.XIsNext ? "X" : "O")
</div>
}
</div>

<div class="game-board">
@for (int i = 0; i < 9; i++)
{
var position = i;
<button class="square" @onclick="() => HandleClick(position)">
@gameState.Board[i]
</button>
}
</div>

<button class="reset-button" @onclick="ResetGame">Reset Game</button>
</div>

<style>
.game-container {
display: flex;
flex-direction: column;
align-items: center;
font-family: Arial, sans-serif;
margin: 20px;
}

.game-board {
display: grid;
grid-template-columns: repeat(3, 100px);
grid-template-rows: repeat(3, 100px);
gap: 4px;
background-color: #333;
padding: 4px;
margin: 20px 0;
}

.square {
background-color: white;
border: none;
font-size: 2.5rem;
font-weight: bold;
cursor: pointer;
transition: background-color 0.2s;
}

.square:hover {
background-color: #f0f0f0;
}

.status {
font-size: 1.5rem;
margin: 20px 0;
}

.game-over {
font-weight: bold;
padding: 10px 20px;
border-radius: 5px;
}

.winner {
background-color: #4CAF50;
color: white;
}

.draw {
background-color: #FFC107;
}

.reset-button {
padding: 10px 20px;
font-size: 1.2rem;
background-color: #2196F3;
color: white;
border: none;
border-radius: 5px;
cursor: pointer;
transition: background-color 0.2s;
}

.reset-button:hover {
background-color: #1976D2;
}
</style>
@code {
private GameState gameState = new GameState();
private void HandleClick(int position)
{
gameState.MakeMove(position);
}
private void ResetGame()
{
gameState.Reset();
}
}Let’s update the main layout to use our new game component:
@inherits LayoutComponentBase

<div class="page">
<main>
@Body
</main>
</div>

<style>
.page {
min-height: 100vh;
display: flex;
justify-content: center;
align-items: center;
background-color: #f5f5f5;
}

main {
background-color: white;
padding: 2rem;
border-radius: 10px;
box-shadow: 0 4px 6px rgba(0, 0, 0, 0.1);
}
</style>
Let’s update the App.razor file to remove the navigation:
<Router AppAssembly="@typeof(App).Assembly">
<Found Context="routeData">
<RouteView RouteData="@routeData" DefaultLayout="@typeof(MainLayout)" />
</Found>
<NotFound>
<PageTitle>Not found</PageTitle>
<LayoutView Layout="@typeof(MainLayout)">
<p role="alert">Sorry, there's nothing at this address.</p>
</LayoutView>
</NotFound>
</Router>
Now let’s run the application to make sure everything works:
- A GameState class that manages:
- The game board state
- Player turns (X and O)
- Win detection
- Draw detection
- Game reset functionality
- A main game component (TicTacToe.razor) that includes:
- A 3×3 game board
- Status display showing the current player or game result
- A reset button
- Modern styling with CSS
- A clean, centered layout for the game
- Turn-based gameplay between X and O players
- Win detection for all possible winning combinations
- Draw detection when the board is full
- A reset button to start a new game
- Responsive design with hover effects
- Clear visual feedback for game status
- Opening your browser to the URL shown in the terminal (typically https://localhost: or http://localhost:)
- Clicking on any square to make a move
- The game will automatically detect wins or draws
- Use the reset button to start a new game at any time
Why Developers Love Cursor AI
Developers like Cursor AI because it saves time and reduces stress. It turns long, hard tasks into quick, simple ones. It’s like having a second brain that knows coding.
Here are a few reasons people use it:
It helps beginners learn faster
It boosts productivity for experts
It works inside a familiar editor (VS Code)
It supports multiple languages, including C#


Jessica is a highly accomplished technical author specializing in scientific computer science. With an illustrious career as a developer and program manager at Accenture and Boston Consulting Group, she has made significant contributions to the successful execution of complex projects.
Jessica’s academic journey led her to CalTech University, where she pursued a degree in Computer Science. At CalTech, she acquired a solid foundation in computer systems, algorithms, and software engineering principles. This rigorous education has equipped her with the analytical prowess to tackle complex challenges and the creative mindset to drive innovation.
As a technical author, Jessica remains committed to staying at the forefront of technological advancements and contributing to the scientific computer science community. Her expertise in .NET C# development, coupled with her experience as a developer and program manager, positions her as a trusted resource for those seeking guidance and best practices. With each publication, Jessica strives to empower readers, spark innovation, and drive the progress of scientific computer science.
